Fuzzing JWT
JSON Web Tokens are usually used to store the identity of authenticated users. JWT has a structure of two JSON objects (header and body) and a signature. They’re base64 encoded and divided by dot:
eyJ0eXAiOiJKV1QiLCJhbGciOiJIUzI1NiJ9.eyJyb2xlIjoidXNlciJ9.ja1aHgEkWUMCJABchgx1ppiKU3eoX0coLqmOGe557zo
— example JWT
Sometimes you may end up in a situation where you need to test a JWT. Either you can sign your own JWT, or you want to test just the header part. But due to the structure of a JWT, it’s impossible to pass it directly to the tools like sqlmap or burp intruder.
In this post, I am showing a way to automate the creation of JWT with the help of mitmproxy.
Proxy
You will need to have mitmproxy installed. It is a convenient tool for modifying requests and responses on the fly with the help of simple python3 scripts.
Example mitmproxy script to show the basic functionality:
def request(flow):
    flow.request.query["jwt"] = flow.request.headers["Authorization"]
		del(flow.request.headers["Authorization"])
It will replace the Authorization header with the query parameter jwt and then delete the header.
You can run it with:
mitmproxy -p 8082 -s example_script.py
And then use it as a proxy:
curl -k -x http://localhost:8082 https://example.com -H "Authorization: something"
The modified request and the response can be seen in the logs:

As we can see, the Authorization header got deleted, and the jwt parameter with the value of that header was added to the request.
Mitmproxy script for testing JWT
Let’s imagine that there’s an application that gives you a JWT with an HS256 signature Here’s that JWT - eyJ0eXAiOiJKV1QiLCJhbGciOiJIUzI1NiJ9.eyJyb2xlIjoidXNlciJ9.ja1aHgEkWUMCJABchgx1ppiKU3eoX0coLqmOGe557zo. You can easily decode it using something like jwt.io:

You also found a secret key that was used to generate it.
You see that there’s a role parameter within the JWT body that you want to test. To do this, you can manually generate a new JWT for every payload, or you can use the following script that will do it automatically!
import json
import base64
import hmac
import hashlib

def create_signed_token(key, header, body):
    encoded_header = base64.urlsafe_b64encode(header).decode().strip('=')
    encoded_body = base64.urlsafe_b64encode(body).decode().strip('=')

    jwt_data = encoded_header + '.' + encoded_body

    d = hmac.new(key, jwt_data.encode('utf-8'), 'sha256')
    dig = d.digest()
    signature = base64.urlsafe_b64encode(dig).decode().strip('=')

    return jwt_data + '.' + signature

def request(flow):
	# get a payload from the 'jwt' query parameter
    payload = ""

    if "jwt" in flow.request.query:
        payload = flow.request.query["jwt"]
        del(flow.request.query["jwt"])

	#create initial parts of JWT
    jwt_header = b'{"typ":"JWT","alg":"HS256"}'
    jwt_body = b'{"role":FUZZ}'

    secret = b'secret_key'

    # add the payload to the jwt body
    jwt_body = jwt_body.replace(b"FUZZ", json.dumps(payload).encode('UTF-8'))

	# generate jwt with the secret key - "secret_key"
    jwt = create_signed_token(secret, jwt_header, jwt_body)

	# set Authorization header with our jwt token
    flow.request.headers["Authorization"] = jwt
fuzz json web tokens with mitmproxy
Notice the jwt_header, jwt_body and secret variables. This simple script takes the jwt parameter from the query and inserts it within the JWT body. Later, it creates a signature using the HS256 alg and adds a new request header — Authorization with the value of the JWT.
Testing the script
I wrote a simple flask python3 application for this purpose. It can be found here. The application takes the JWT token from the Authorization header and prints the value of the role parameter within the JWT body. The secret key is secret_key.
Start the application and mitmproxy with the script above:
python3 main.py #runs flask app on 2222 port
mitmproxy -p 8081 -s script.py -m socks5
The -m socks5 argument is needed because we are going to proxy burpsuite that supports only socks proxies.
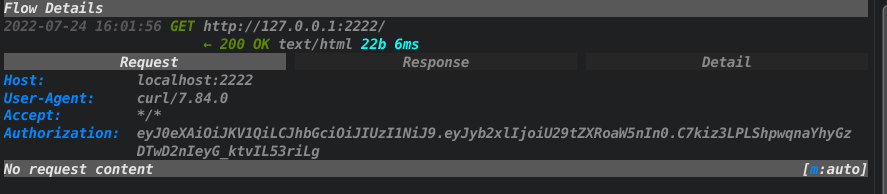
Verifying:
curl -k --socks5 http://localhost:8081 'http://localhost:2222/?jwt=Something'

Your role is Something
The application returns Your role is Something that confirms that the script works and mitmproxy successfully generated JWT.
If we check the mitmproxy logs:
We can see that mitmproxy successfully replaced the jwt parameter with the Authorization header that contains a valid JWT token with the {"role":""Something"} body.
Now we can use all the tools to test the JWT without any additional changes. For example, sqlmap:
sqlmap -u http://localhost:2222/?jwt=something --proxy socks5://localhost:8081
Or even all of the burpsuite tools. For this, you need to go to User options —> SOCKS Proxy and write down the ip and the port of the mitmproxy. Now you can audit it manually via repeater:
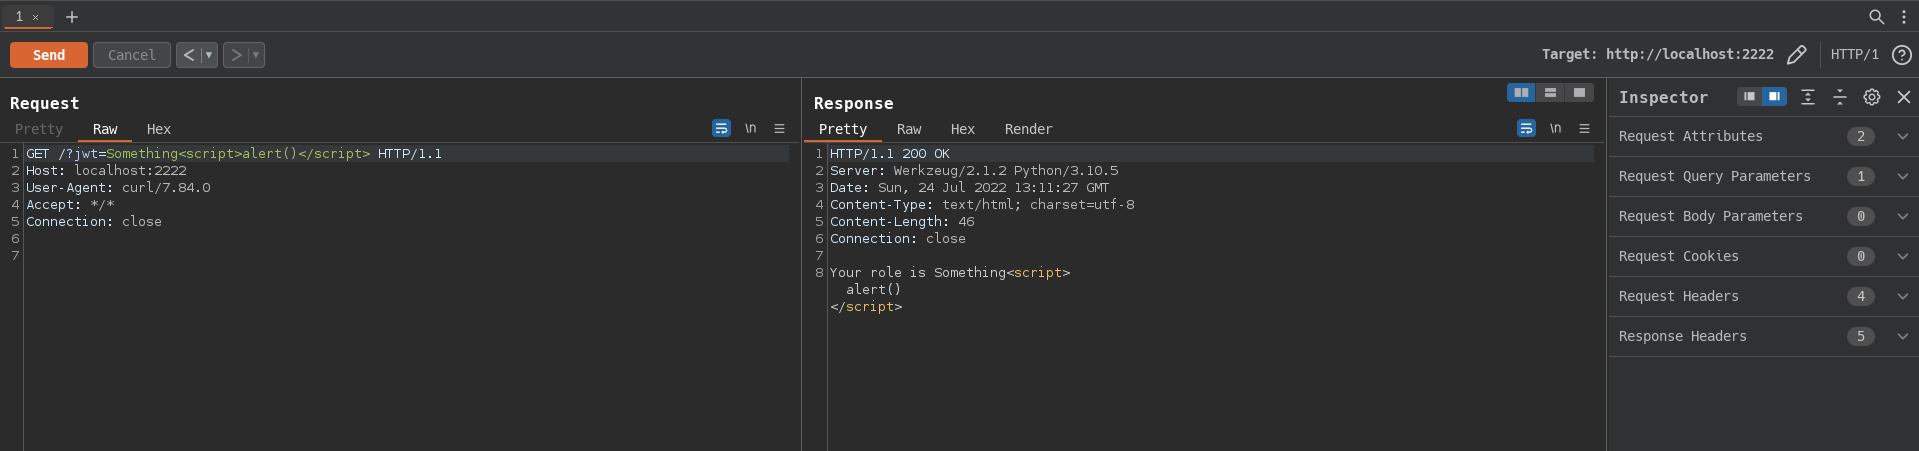
Or use tools like intruder.
Bonus: integration with x8
With x8, it’s even possible to search for parameters within the JWT token. For this purpose, replace jwt_body = b'{"role":FUZZ}' with jwt_body = b'{"role":"user", FUZZ}' and json.dumps(payload).encode('UTF-8') with payload.encode('UTF-8') in the mitmproxy script.
Now you can run it with something like this:
x8 -u http://localhost:2222/?jwt=%s -t json -w wordlist -x socks5://localhost:8081
The tool will try to find parameters within the JWT body aside the role one.
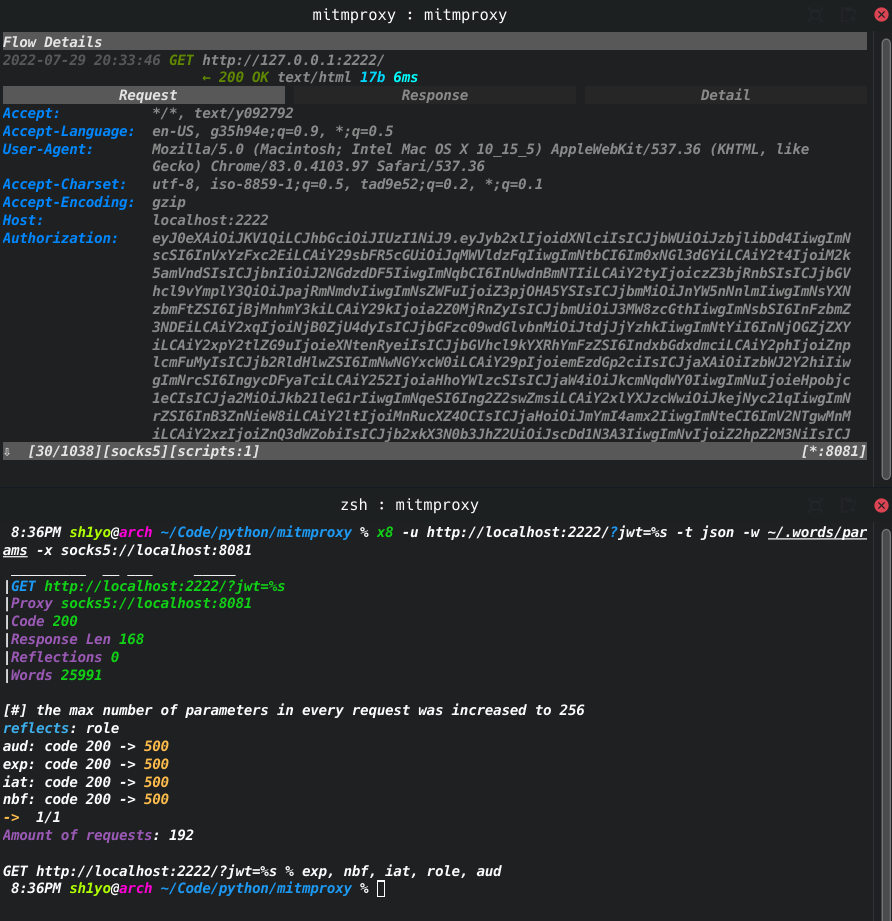
As we can see, the Authorization header became longer because of all those parameters. Moreover, it turned out that there were some hidden parameters within pyjwt itself!